Beginners Guide
How do I plant my daylilies?
When you receive your new daylilies, use the following technique for planting them.
After Plants Are Received
New daylily plants, particularly those received through the mail or bought at the show, should be soaked for a few hours or overnight in water or in a weak solution of liquid fertilizer.
Before Planting
Make sure that your daylilies are clean and healthy before planting them. Trim old or discolored leaves and remove any spent flowers.
Prepare the Soil
The soil where you intend to plant your daylilies should be worked into a good loose condition to a depth of at least 1 foot. Dig a hole larger than the root mass.

-
Make a mound in the center of the hole.
-
Set the plant in place with the roots spread on all sides of the mound.
-
New plants should be planted about as deep as they grew originally. The original depth can be determined easily by the band of white at the base of the foliage which indicates the part of the plant which was underground.
-
Do not set the crown (i.e., the point where foliage and roots join) more than 1 inch below the surface of the soil.
-
Work the soil around and between the roots as you cover the plant.
-
Firm the soil and water well.
-
Make sure that there are no air pockets; this can cause the plant to grow poorly.
-
When all the water has soaked in, finish filling in the soil, leaving a slight depression around the plant.
Spacing
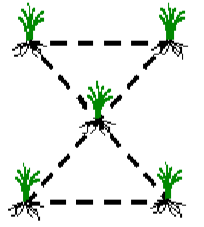
Daylilies should be spaced no less than 18 to 24 inches apart on each side.
Labeling
Label each of your daylilies with some type of permanent marker so as to identify them. A plant loses much of its value when its identification is lost.
Used with permission of the American Hemerocallis Society (www.daylilies.org)
Online orders/shipping is closed for the summer and will resume in September Dismiss